Setup a Solo Bitcoin Node and Pool
on Ubuntu using Bitcoin Knots, ckpool-solo, ckstats, Electrum server and mempool.space

This article is for anyone with a Bitcoin solo miner (like a Bitaxe) who wants to mine on their own solo pool and wants to know how to build everything from scratch.
The aim is to be able to see your Bitcoin miner say something like this:
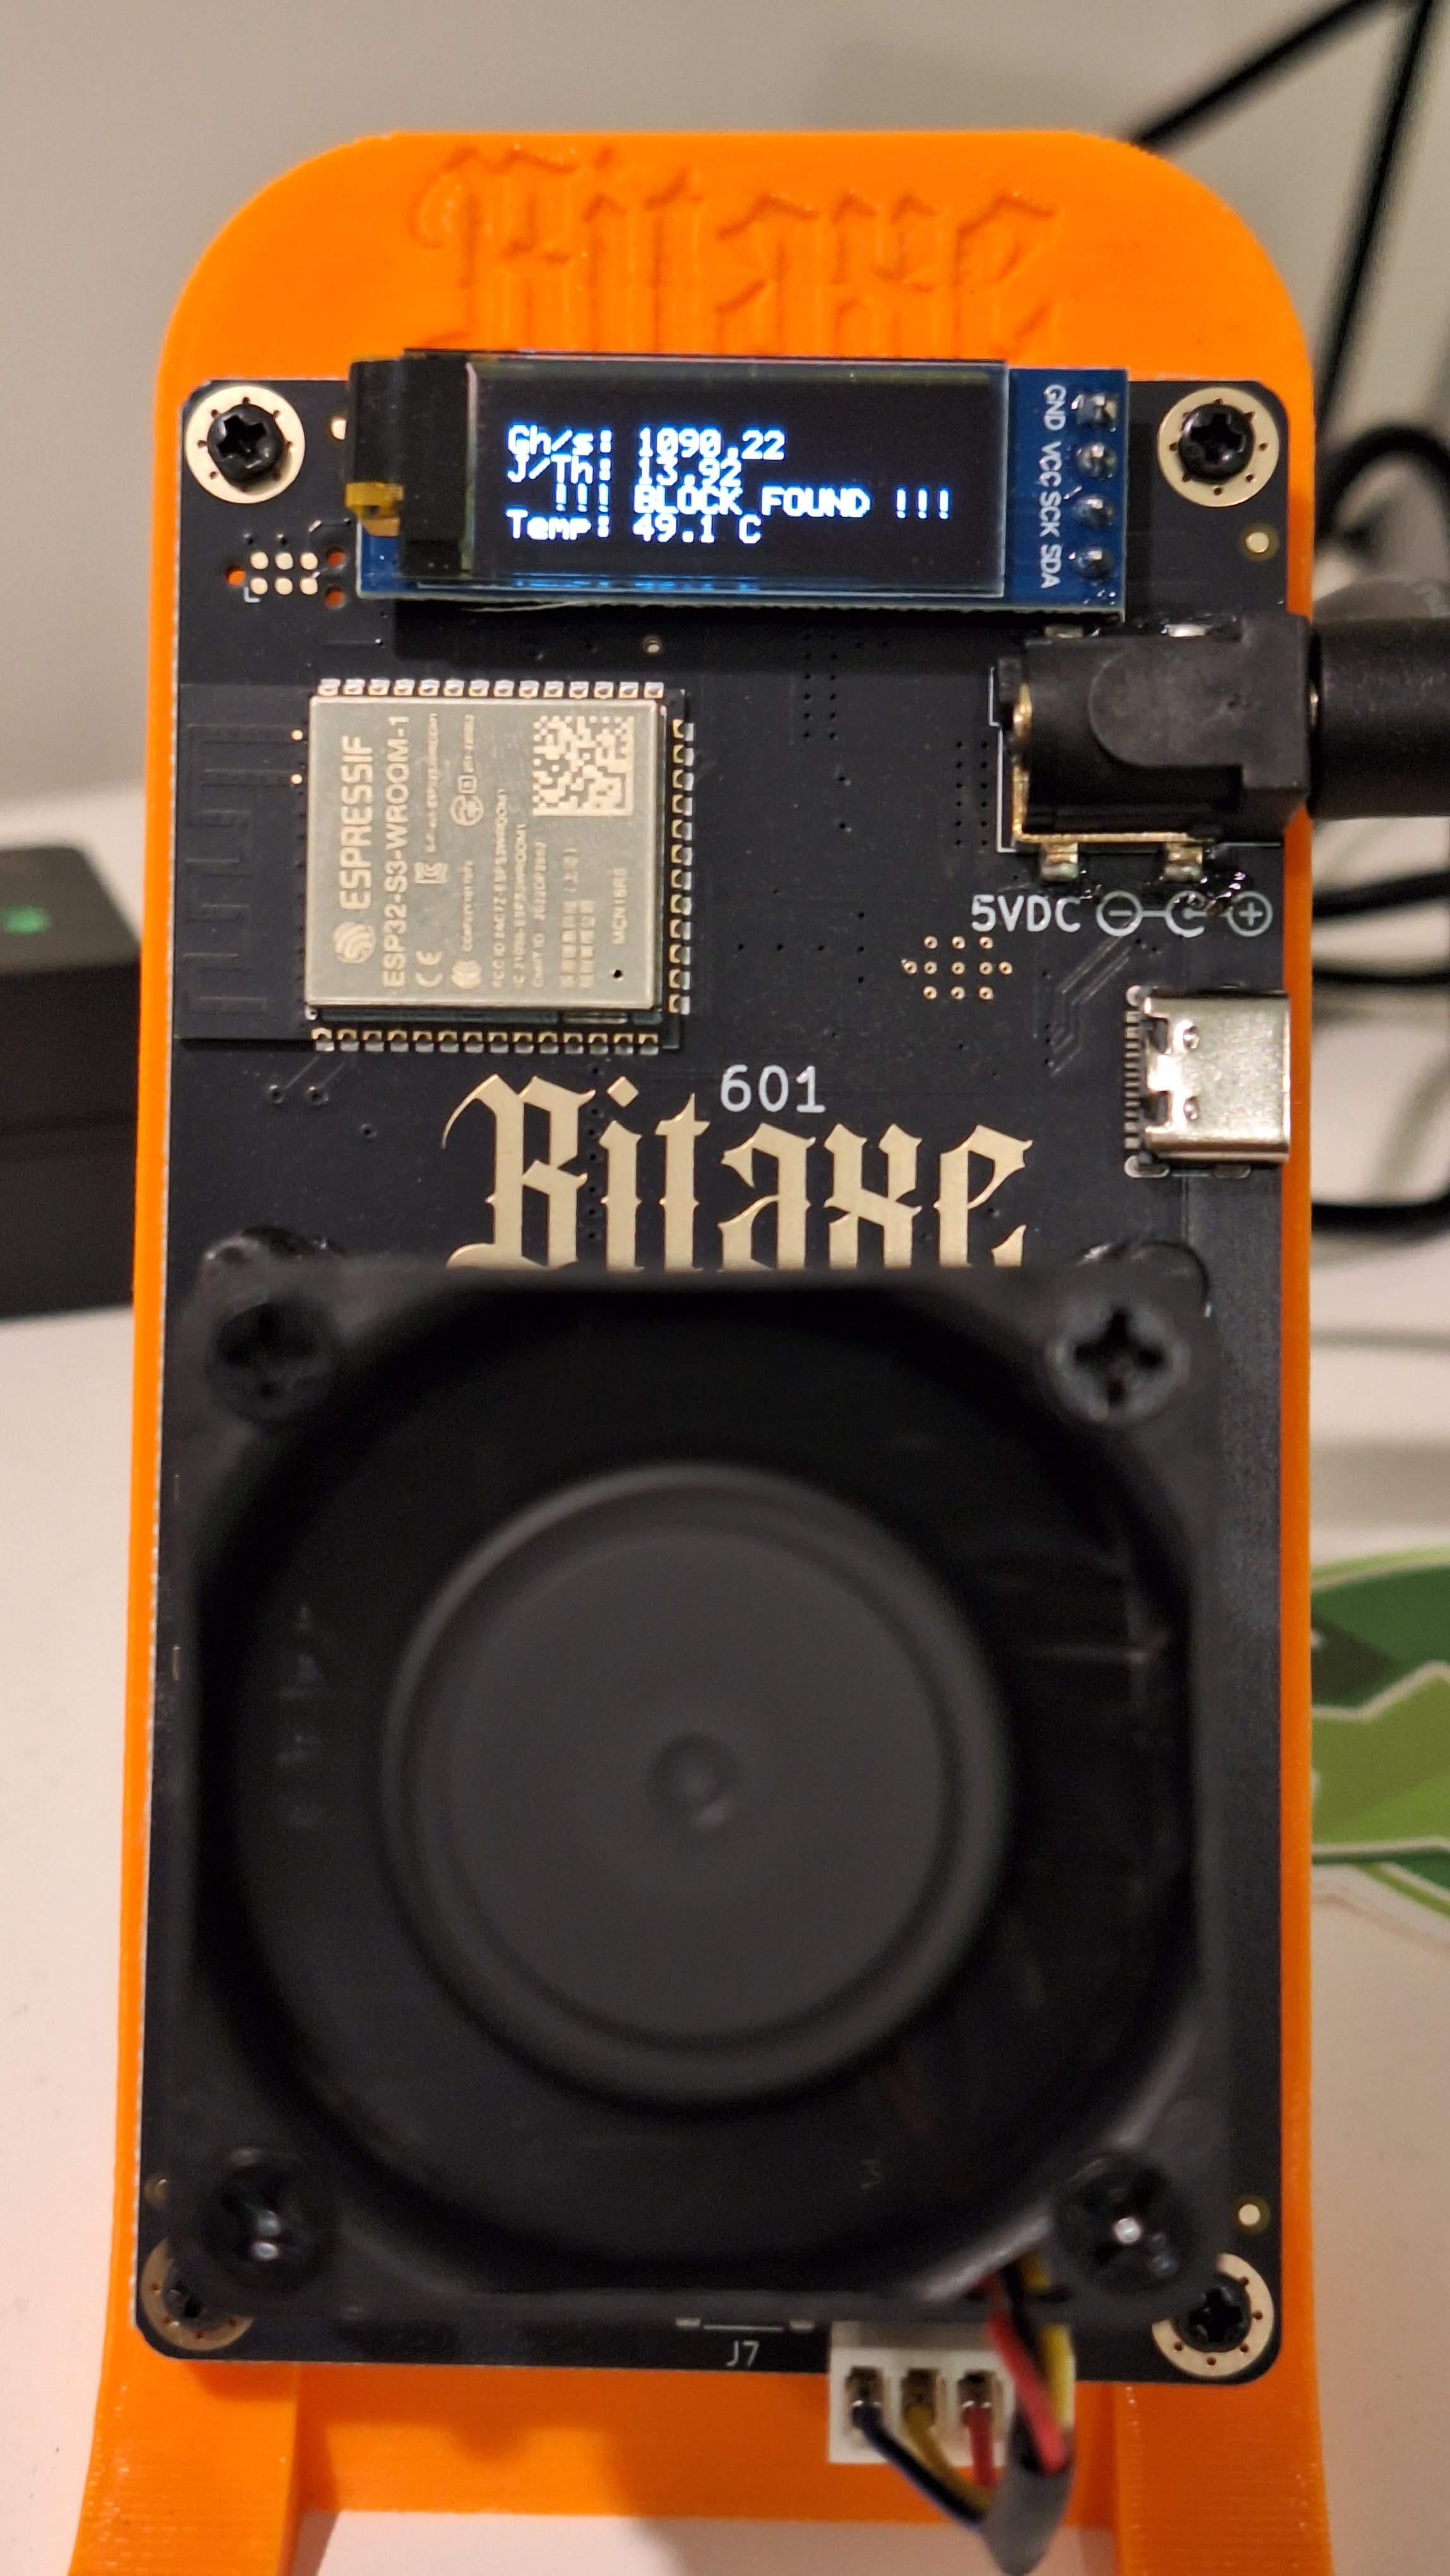
That is a picture of my Bitaxe, after solving a block on testnet, proving the entire system works.
A video walkthrough of the process can be found here:
We will set up:
Bitcoin Knots for our Bitcoin node, optimised for solo mining.
ckpool-solo for our mining pool.
Electrum Server, which can also be used with your Bitcoin Wallet.
A web front-end called ckstats for monitoring ckpool-solo.
A web front-end called mempool-space for monitoring the Bitcoin blockchain on your node.
We will configure all of the above both for Bitcoin’s mainnet, and optionally for testnet4 (which I’ll refer to as testnet). Setting up testnet is optional, but if you setup testnet then you can mine to it and prove that everything works, rather than hoping and trusting that it does.
The process starts with selecting a machine. It will need a minimum of 8GB of RAM and a 2TB SSD. It should have a 64-bit CPU, but it doesn’t matter if it is Intel or ARM.
I’m using an Odroid M2 16GB device with a 2TB NVME. These are like a Raspberry Pi 5, but a LOT faster.
I used to use a 1L mini-PC, but the Odroids are faster and about the same price as a second-hand mini-PC.
You will need Ubuntu installed. I started with a minimal install of Ubuntu Server, which has no GUI. You can also use Ubuntu desktop.
I have assumed you know how to use a Linux text editor. I prefer vi. nano is easier for beginners. If you don’t know how to use a text editor yet, then go watch some videos on YouTube before proceeding. You are going to need to know how to open and save files, search for text, and make changes.
The major steps in the process are:
Create a build environment
[Optional] Add additional storage to store the blockchain on
Install Bitcoin Knots for Bitcoin’s mainnet
[Optional] Install Bitcoin Knots for testnet
Install ckpool-solo for mainnet
[Optional] Install ckpool-solo for testnet
Prove it works!
[Optional] Install ckstats for monitoring ckpool-solo on the mainnet
[Optional] Install ckstats for monitoring ckpool-solo on the testnet
[Optional] Install Electrum Server for mainnet
[Optional] Install Electrum Server for testnet
[Optional] Install mempool.space backend for mainnet
[Optional] Install mempool.space frontend for mainnet
Many TCP ports will be created in this environment. The web interfaces are what you’ll be able to point your web browser at. This is what all the ports are used for.
TCP, Description
3306 MariaDB
3333 ckpool-solo mainnet (mine to this port)
3334 Web interface for ckstats mainnet
3433 ckpool-solo testnet (mine to this port)
3434 Web interface for ckstats testnet
4200 Web interface for mempool.space
5432 PostgreSQL
8331 knots mainnet zmq
8332 knots mainnet RPC port
8333 knots mainnet P2P port
8335 Electrum Server mainnet (non-SSL)
8999 Mempool.space backend for mainnet
48331 knots testnet zmq
48332 knots testnet RPC port
48333 knots testnet P2P port
48335 Electrum Server testnet (non-SSL)
Enable MDNS Name Resolution
This step allows Ubuntu Server to respond to MDNS queries for its name.
sudo apt install avahi-daemonCreate a build environment
We will build all the software from scratch. To achieve this, we will create a build environment.
First, become the superuser (otherwise, we’ll need to use sudo for every command for a while).
sudo suThen install the build environment. If you get an error running any of these commands, run them again.
apt update
apt upgrade
apt install -y build-essential yasm libtool autotools-dev automake
apt install -y pkg-config bsdmainutils python3
apt install -y rustup clang libclang-dev cmake nodejs npm
apt install -y libevent-dev libboost-dev libzmq3-dev librocksdb-dev
We will also use PGP to verify signatures (where possible).
apt install gnupgAdding additional storage
I have added a 2TB NVME to my ODroid. I’m going to make it my new /home directory. If you have added a second drive, you’ll need to follow a process similar to this.
To start setting it up, let’s first become the super user:
sudo suThen, list all the block devices:
lsblkIn my case, this is what I see:
odroid@server:~$ lsblk
NAME         MAJ:MIN RM  SIZE RO TYPE MOUNTPOINTS
mmcblk0      179:0    0 58.3G  0 disk
├─mmcblk0p1  179:1    0  512M  0 part /boot
└─mmcblk0p2  179:2    0 57.7G  0 part /
mmcblk0boot0 179:32   0    4M  1 disk
mmcblk0boot1 179:64   0    4M  1 disk
nvme0n1      259:0    0  1.8T  0 disk
The last line, the 1.8T drive, is the NVME. Your drive might have a different name. Make a note and use your drive’s name in the following commands instead.
Let's partition it and label it.
parted /dev/nvme0n1
mklabel gpt
mkpart primary ext4 0% 100%
name 1 HOME
Next, let’s format our new partition.
mkfs -t ext4 /dev/nvme0n1p1
e2label /dev/nvme0n1p1 HOME
Let’s add it to /etc/fstab now, and mount it temporarily at /mnt.
LABEL="HOME" /mnt ext4 rw,relatime,data=ordered 0 0After changing the /etc/fstab we need to tell the daemon to reload it, and then we can test mounting the new drive.
systemctl daemon-reload
mount /mnt
Now we can copy the existing /home directory to the new drive:
rsync -avx /home/ /mnt/Check that everything looks ok after the data is transferred:
ls -l /home
ls -l /mnt
Time to unmount the new 2TB drive:
umount /mntAnd now update /etc/fstab to mount the new drive as /home by changing:
LABEL="HOME" /mnt ext4 rw,relatime,data=ordered 0 0to:
LABEL="HOME" /home ext4 rw,relatime,data=ordered 0 0We need to ask the daemon to read the updated /etc/fstab, and mount the new drive as /home.
systemctl daemon-reload
mount /home
Verify everything looks ok:
lsblk
ls -l /home
Installing Bitcoin Knots
Bitcoin Knots is the actual Bitcoin node software that we will be using. I am going to create two installations, one for Bitcoin mainnet and another for Bitcoin testnet. I am creating a second installation for testnet so I can prove that it works (rather than trusting that it works), and to be able to test updates before putting them into production.
You don’t need to set up testnet to have a working Bitcoin node and local solo pool. The testnet setup is optional.
The repository for this is:https://github.com/bitcoinknots/
knots - mainnet
Create a new group called mainnet. We’ll make all the mainnet Bitcoin related users members of this group.
sudo groupadd mainnetCreate a user account for mainnet.
sudo useradd -g mainnet -m -s /bin/bash knots-mainnetWe are going to build Bitcoin Knots from scratch. Let’s become the new mainnet user and download the software.
sudo su - knots-mainnetNow we can clone the github repository for Bitcoin Knots.
git clone https://github.com/bitcoinknots/bitcoin.gitWe now need to switch to the correct branch.
git switch 28.x-knotsNow we verify that what we have downloaded is legit and has been signed. When you first run these commands, it will say:
Can't check signature: No public key
cd bitcoin
git verify-tag `git describe`
Note the key. Import the key with:
gpg --recv-keys "1A3E761F19D2CC7785C5502EA291A2C45D0C504A"Now run the verify again,
git verify-tag `git describe`You should get a warning that the signature is good, but the key is not certified.
We can now start the build process. I am completely disabling the wallet feature, as this is not needed for solo mining, and this machine is likely to have a port directly exposed to the Internet. I am also disabling the GUI, since this is running headless on a server. Sometimes you get an error the first time you run autogen.sh. If this happens, then run it again.
./autogen.sh
./configure CFLAGS="-O2 -march=native" --disable-wallet --without-gui
make -j 4
Let’s create a config file.
mkdir -p ~/.bitcoin
cp share/examples/bitcoin.conf ~/.bitcoin
Next up, we need to generate a random RPC password. Run the following command:
share/rpcauth/rpcauth.py rpcadminYou will get an output that looks something like the below. Save this somewhere and label it “mainnet rpc details”. We will be referring to it many times. Especially note “Your password”. This will go into every subsequent component.
String to be appended to bitcoin.conf:
rpcauth=rpcadmin:154615a...511cee2602c
Your password:
4zM8RQuTudM37Vrfehmf762JqH71EfgT6pharMgHEJA
Configure the values below in ~/.bitcoin/bitcoin.conf. txindex is used by some Electrum servers and mempool.space. Copy and paste the rpcauth line from above into the config below. The remaining values make the configuration more optimal for solo mining.
txindex=1
blockmaxsize=3985000
blockmaxweight=3985000
maxmempool=1000
blockreconstructionextratxn=1000000
rpcauth=rpcadmin:154615a...511cee2602c
zmqpubhashblock=tcp://127.0.0.1:8331
We can now do a test run of our Bitcoin Knots daemon.
src/bitcoindIf there are no errors after 30s, press CTRL-C to stop it. Now we’ll configure Bitcoin Knots to run as a systemd service.
Now we need to go back to being a privileged user:
exitCreate a file called (using sudo in front of your editor) called /etc/systemd/system/knots-mainnet.service
And put this into it:
[Unit]
Description=Bitcoin Knots mainnet daemon
After=network.target
Wants=network-online.target

[Service]
User=knots-mainnet
Group=mainnet
Type=forking
PIDFile=/home/knots-mainnet/.bitcoin/bitcoin.pid
ExecStart=/home/knots-mainnet/bitcoin/src/bitcoind -daemon -pid=bitcoin.pid
ExecStop=/home/knots-mainnet/bin/bitcoin-cli stop
Restart=always
TimeoutSec=120
RestartSec=30
PrivateTmp=yes
ProtectSystem=full
NoNewPrivileges=yes
PrivateDevices=yes

[Install]
WantedBy=multi-user.target
Next, we enable and start the service (paste these in one line at a time).
sudo systemctl daemon-reload
sudo systemctl enable knots-mainnet.service
sudo systemctl start knots-mainnet.service
sudo systemctl status knots-mainnet.service
sudo journalctl -xeu knots-mainnet.service
You can also check the log with:
sudo tail /home/knots-mainnet/.bitcoin/debug.logThe next step is to configure log rotation. First, make sure the logrotate daemon is installed:
sudo apt install logrotateCreate the file (using sudo in front of your editor):
/etc/logrotate.d/knots-mainnet
/home/knots-mainnet/.bitcoin/debug.log
{
        su knots-mainnet mainnet
        missingok
        notifempty
        compress
        delaycompress
        sharedscripts
        copytruncate
}
Then restart the service and ensure it is running ok (otherwise we have made a typo).
sudo systemctl restart logrotate.service
sudo systemctl status logrotate.service
To make life easier, let’s make some of the core executables available via the path.
sudo su - knots-mainnet
mkdir -p ~/bin
ln -s ~/bitcoin/src/bitcoin-cli ~/bin/bitcoin-cli
source ~/.profile
Now you can use test commands like:
bitcoin-cli -netinfo
bitcoin-cli getnetworkinfo
bitcoin-cli getblockchaininfo
bitcoin-cli getpeerinfo
After completing this process, and leaving mainnet to download, 771GB of disk space was consumed.
The final, optional but recommended step, is to port forward tcp/8333 from your Internet router to your Bitcoin node.
knots - testnet
The setup for testnet is very similar to the mainnet. Lets create a new group and user.
exit
sudo groupadd testnet
sudo useradd -g testnet -m -s /bin/bash knots-testnet
We need to become the new testnet user and start the build process. We are downloading the source code again because we might want to test a different version of Bitcoin Knots in the future, before we upgrade our mainnet installation.
sudo su - knots-testnet
git clone https://github.com/bitcoinknots/bitcoin.git
cd bitcoin/
git switch 28.x-knots
git verify-tag `git describe`
gpg --recv-keys "1A3E761F19D2CC7785C5502EA291A2C45D0C504A"
git verify-tag `git describe`
./autogen.sh
./configure CFLAGS="-O2 -march=native" --disable-wallet --without-gui
make -j 4
Let's make another config file.
mkdir -p ~/.bitcoin
cp share/examples/bitcoin.conf ~/.bitcoin
And create another random RPC password.
share/rpcauth/rpcauth.py rpcadminSave these new password details somewhere and label them “testnet rpc details”. We will be referring to it many times. Especially note “Your password”. This will go into every subsequent component.
String to be appended to bitcoin.conf:
rpcauth=rpcadmin:c07e1e91f67150da...096efb21d5402
Your password:
LD7ZKl91gLzfpOkMV8RK1Tq0qDf6UkL1PDelboFgvdU
Configure the values below in ~/.bitcoin/bitcoin.conf. txindex is used by some Electrum servers and mempool.space. Copy and paste the rpcauth line from above into the config below. The remaining values make the configuration more optimal for solo mining. You’ll note we are configuring this instance to run on the testnet4 chain (we’ll refer to this as testnet).
txindex=1
blockmaxsize=3985000
blockmaxweight=3985000
maxmempool=1000
blockreconstructionextratxn=1000000
zmqpubhashblock=tcp://127.0.0.1:48331
rpcauth=rpcadmin:c07e1e91f67150da...096efb21d5402
chain=testnet4
We can now do a test run of our Bitcoin Knots daemon.
src/bitcoindIf there are no errors after 30 seconds, press CTRL-C to stop it. Now we’ll configure Bitcoin Knots to run as a systemd service.
Now we need to go back to being a privileged user:
exitCreate a file called (using sudo in front of your editor):
/etc/systemd/system/knots-testnet.service
And put this into it:
[Unit]
Description=Bitcoin Knots testnet daemon
After=network.target
Wants=network-online.target

[Service]
User=knots-testnet
Group=testnet
Type=forking
PIDFile=/home/knots-testnet/.bitcoin/testnet4/bitcoin.pid
ExecStart=/home/knots-testnet/bitcoin/src/bitcoind -daemon -pid=bitcoin.pid
ExecStop=/home/knots-testnet/bin/bitcoin-cli stop
Restart=always
TimeoutSec=120
RestartSec=30
PrivateTmp=yes
ProtectSystem=full
NoNewPrivileges=yes
PrivateDevices=yes

[Install]
WantedBy=multi-user.target
Next, we enable and start the service (paste these in one line at a time).
sudo systemctl daemon-reload
sudo systemctl enable knots-testnet.service
sudo systemctl start knots-testnet.service
sudo systemctl status knots-testnet.service
sudo journalctl -xeu knots-testnet.service
You can also check the log with:
sudo tail /home/knots-testnet/.bitcoin/testnet4/debug.logCreate the file (using sudo in front of your editor):
/etc/logrotate.d/knots-testnet
/home/knots-testnet/.bitcoin/debug.log
{
        su knots-testnet testnet
        missingok
        notifempty
        compress
        delaycompress
        sharedscripts
        copytruncate
}
Let’s restart the service and make sure it is running ok (otherwise we have made a typo).
sudo systemctl restart logrotate.service
sudo systemctl status logrotate.service
To make life easier, let’s make some of the core executables available via the path.
sudo su - knots-testnet
mkdir -p ~/bin
ln -s ~/bitcoin/src/bitcoin-cli ~/bin/bitcoin-cli
source ~/.profile
Now you can use test commands like:
bitcoin-cli -netinfo
bitcoin-cli getnetworkinfo
bitcoin-cli getblockchaininfo
bitcoin-cli getpeerinfo
At the time of writing, testnet uses approximately 8.8GB of disk space.
The final, optional but recommended step, is to port forward tcp/48333 from your Internet router to your Bitcoin node.
Installing ckpool-solo
CKPool is the actual solo mining pool software. I am going to create two installations again, one for mainnet and one for testnet.
I am creating a second installation for testnet so I can prove that it works, rather than trusting that it works. You don’t need to set up testnet to have a working solo pool. The testnet setup is optional.
The repository for this is:
https://bitbucket.org/ckolivas/ckpool-solo/src/solobtc/
ckpool-solo - mainnet
First, let’s add a user account to run the mainnet solo pool under.
sudo useradd -g mainnet -m -s /bin/bash ckpool-mainnetBecome the new mainnet user and start the build process (copy and paste these lines one at a time).
sudo su - ckpool-mainnet
git clone https://bitbucket.org/ckolivas/ckpool-solo/src/solobtc/
cd solobtc
./autogen.sh
./configure CFLAGS="-O2 -march=native"
make -j 4
Now we can configure ckpool. First, let’s back up the sample ckpool.conf.
mv ckpool.conf ckpool.originalAnd now create ckpool.conf. You’ll need to fill in the rpc password you saved when configuring the Bitcoin mainnet node.
{
"btcd" :  [
        {
        "url" : "127.0.0.1:8332",
        "auth" : "rpcadmin",
        "pass" : "random_password",
        "notify" : true
        }
],
"btcsig" : "/anything you want to appear in the blocks you mine/",
"donation" : 0.5
}
Let’s try starting CKPool and see if it is happy with the config.
src/ckpool -BIf there are no errors after 30s, press CTRL-C. We need to set it up as a systemd service now. This needs to be done as a user who can use sudo.
exitCreate the file (using sudo in front of your editor):
/etc/systemd/system/ckpool-mainnet.service
[Unit]
Description=ckpool solo Bitcoin pool on mainnet
After=multi-user.target knots-mainnet.service
Requires=knots-mainnet.service

[Service]
User=ckpool-mainnet
Group=mainnet
Type=simple
Restart=always
WorkingDirectory=/home/ckpool-mainnet/solobtc
ExecStart=/home/ckpool-mainnet/solobtc/src/ckpool -B -s solobtc
PrivateTmp=yes
ProtectSystem=full
NoNewPrivileges=yes
PrivateDevices=yes

[Install]
WantedBy=multi-user.target
Let’s enable and start the new service (paste in the commands one at a time).
sudo systemctl daemon-reload
sudo systemctl enable ckpool-mainnet.service
sudo systemctl start ckpool-mainnet.service
sudo systemctl status ckpool-mainnet.service
sudo journalctl -xeu ckpool-mainnet.service
Now we need to configure log rotation. Create the file (using sudo with your editor) /etc/logrotate.d/ckpool-mainnet
/home/ckpool-mainnet/solobtc/logs/ckpool.log
{
        su ckpool-mainnet mainnet
        missingok
        notifempty
        compress
        delaycompress
        sharedscripts
        copytruncate
}
Restart the log rotation daemon to pick up the new config and check that it started running ok.
sudo systemctl restart logrotate.service
sudo systemctl status logrotate.service
You can see general ckpool statistics in these directories (either use sudo or become ckpool-mainnet).
/home/ckpool-mainnet/solobtc/logs/pool
/home/ckpool-mainnet/solobtc/logs/users
/home/ckpool-mainnet/solobtc/logs/workers
ckpool-solo - testnet
The setup for testnet is very similar to mainnet.
sudo useradd -g testnet -m -s /bin/bash ckpool-testnetWe need to become the new testnet user, and start the build process. We are downloading the source code again, because we might want to test a different version of CKPool in the future, before we upgrade our mainnet installation.
sudo su - ckpool-testnet
git clone https://bitbucket.org/ckolivas/ckpool-solo/src/solobtc/
cd solobtc
./autogen.sh
./configure CFLAGS="-O2 -march=native"
make -j 4
Now we can configure ckpool. First lets backup the sample ckpool.conf.
mv ckpool.conf ckpool.originalAnd now create ckpool.conf. You’ll need to fill in the rpc password you saved when configuring the Bitcoin testnet node.
{
"btcd" :  [
        {
        "url" : "127.0.0.1:48332",
        "auth" : "rpcadmin",
        "pass" : "random_password",
        "notify" : true
        }
],
"btcsig" : "/anything you want to appear in the blocks you mine/",
"zmqblock" : "tcp://127.0.0.1:48331",
"serverurl" : [
        "0.0.0.0:3433"
]
}
Let’s try starting up CKPool and see if it is happy with the config.
src/ckpool -B -s solobtcIf there are no errors after 30s, press CTRL-C. We need to set it up as a systemd service now.
exitCreate the file (using sudo):
/etc/systemd/system/ckpool-testnet.service
[Unit]
Description=ckpool solo Bitcoin pool on testnet
After=multi-user.target knots-testnet.service
Requires=knots-testnet.service

[Service]
User=ckpool-testnet
Group=testnet
Type=simple
Restart=always
WorkingDirectory=/home/ckpool-testnet/solobtc
ExecStart=/home/ckpool-testnet/solobtc/src/ckpool -B -s solobtc

[Install]
WantedBy=multi-user.target
Let’s enable and start the new service (paste in the commands one at a time).
sudo systemctl daemon-reload
sudo systemctl enable ckpool-testnet.service
sudo systemctl start ckpool-testnet.service
sudo systemctl status ckpool-testnet.service
sudo journalctl -xeu ckpool-testnet.service
Now we need to configure log rotation. Create the file (using sudo) /etc/logrotate.d/ckpool-testnet
/home/ckpool-testnet/solobtc/logs/ckpool.log
{
        su ckpool-testnet testnet
        missingok
        notifempty
        compress
        delaycompress
        sharedscripts
        copytruncate
}
Restart the log rotation daemon to pick up the new config and check that it started running ok.
sudo systemctl restart logrotate.service
sudo systemctl status logrotate.service
You can see general ckpool statistics in these directories (either use sudo or become ckpool-testnet).
/home/ckpool-testnet/solobtc/logs/pool
/home/ckpool-testnet/solobtc/logs/users
/home/ckpool-testnet/solobtc/logs/workers
Proving it works
To verify that our new configuration works, we will solo mine to testnet (specifically testnet4). You can only do this section if you did the optional testnet sections above.
First, check out the current testnet4 hash rate.
https://mempool.space/testnet4/mining
If the current testnet4 hashrate is 500 TH/s (and it can vary widely depending on what people are testing), and you have 1 TH/s, then you have a 1 in 500 chance every 10 minutes of solving the block.
A block is meant to be solved every 10 minutes (the testnet can be a bit all over the place). That means there are 6 blocks an hour, 144 blocks per day.
If all of these numbers held, then you could expect to have to leave the solo miner running for 2 to 4 weeks before solving a block, if you have about average luck.
To start, you are going to need a testnet4 wallet. I am going to use Electrum.
https://electrum.org/#download
Once you have downloaded and installed Electrum, you need to add --testnet4 to the command line (in Windows, you can do this by going into properties on the desktop icon). Refer to the video if you get stuck.
Once in Electrum you need to generate a receive address. testnet4 addresses begin with tb1. If your address does not begin with tb1 you are not on testnet, stop, and fix this issue.
The system configuration uses port 3333 for mainnet and 3433 for testnet. You need to update your solo miner to use the IP address of your machine you have been setting up, with the port 3433, and your testnet wallet address.
Installing ckstats
ckstats is a web-based GUI for monitoring ckpool-solo. We will create two installations, like with the other systems, mainnet and testnet.
You don’t need to setup testnet to have a working solo pool. The testnet setup is optional.
The repository for this is:https://github.com/mrv777/ckstats
ckstats - mainnet
First, let’s add a user account to run the mainnet GUI under, and install the required packages. Start this process as your root user.
sudo useradd -g mainnet -m -s /bin/bash ckstats-mainnet

sudo apt install postgresql postgresql-contrib
Now we need to create a table in PostgreSQL.
sudo -u postgres psql
create user "ckstats-mainnet";
create database "ckstats-mainnet" owner "ckstats-mainnet";
\q
Become the new mainnet user and start the build process (copy and paste these lines one at a time).
sudo su - ckstats-mainnet
curl -fsSL https://get.pnpm.io/install.sh | bash
source ~/.bashrc
git clone https://github.com/mrv777/ckstats.git
cd ckstats
Create a file called .env with the below contents.
API_URL="/home/ckpool-mainnet/solobtc/logs"
DB_HOST="/var/run/postgresql/"
DB_USER="ckstats-mainnet"
DB_NAME="ckstats-mainnet"
DB_SSL=false
Next up is building the ckstats environment. Paste these commands one at a time. ”pnpm approve-builds” will present a menu asking you to approve building “es5-ext”. Make that approval (you can use “a” for all, return and then “y”).
pnpm install
pnpm approve-builds
npx update-browserslist-db@latest
pnpm migration:run
pnpm seed
pnpm build
Let’s do an initial test to make sure everything is running.
pnpm start --port 3334Now, browse to the IP address of your machine running the software using HTTP on port 3334. You should see ckpoolstats come up.
http://192.168.x.x:3334/If everything is working correctly, press CTRL-C to exit. Three scripts need to be scheduled to be run. First, run them one at a time and make sure there are no errors.
pnpm seed
pnpm update-users
pnpm cleanup
Next, we need to setup a crontab for those scripts using “crontab -e”. Add these jobs:
PATH=/home/ckstats-mainnet/.local/share/pnpm:/usr/bin:/bin
*/1 * * * * cd /home/ckstats-mainnet/ckstats && pnpm seed
*/1 * * * * cd /home/ckstats-mainnet/ckstats && pnpm update-users
5 */2 * * * cd /home/ckstats-mainnet/ckstats && pnpm cleanup
Lastly, we need to create a systemd unit to start everything automatically. Return to being the superuser, and create the file (using sudo):
/etc/systemd/system/ckstats-mainnet.service
exit
sudo vi /etc/systemd/system/ckstats-mainnet.service
[Unit]
Description=ckstats on mainnet
After=multi-user.target ckpool-mainnet.service postgresql.service
Requires=ckpool-mainnet.service postgresql.service
[Service]
User=ckstats-mainnet
Group=mainnet
Type=simple
Restart=always
WorkingDirectory=/home/ckstats-mainnet/ckstats
ExecStart=/home/ckstats-mainnet/.local/share/pnpm/pnpm start --port 3334
RestartSec=30
PrivateTmp=yes
ProtectSystem=full
NoNewPrivileges=yes
PrivateDevices=yes
[Install]
WantedBy=multi-user.targetLet’s enable and start the new service (paste in the commands one at a time).
sudo systemctl daemon-reload
sudo systemctl enable ckstats-mainnet.service
sudo systemctl start ckstats-mainnet.service
sudo systemctl status ckstats-mainnet.service
sudo journalctl -xeu ckstats-mainnet.service
ckstats - testnet
This section is optional, and only if you want to monitor the testnet ckpool.
Let’s add a user account to run the testnet web interface under. Start this process as your root user.
sudo useradd -g testnet -m -s /bin/bash ckstats-testnetNow we need to create a table in PostgreSQL.
sudo -u postgres psql
create user "ckstats-testnet";
create database "ckstats-testnet" owner "ckstats-testnet";
\q
Become the new testnet user and start the build process (copy and paste these lines one at a time).
sudo su - ckstats-testnet
curl -fsSL https://get.pnpm.io/install.sh | bash
source ~/.bashrc
git clone https://github.com/mrv777/ckstats.git
cd ckstats
Create a file called .env with the below contents.
API_URL="/home/ckpool-testnet/solobtc/logs"
DB_HOST="/var/run/postgresql/"
DB_USER="ckstats-testnet"
DB_NAME="ckstats-testnet"
DB_SSL=false
Next up is building the ckstats environment. Paste these commands one at a time. ”pnpm approve-builds” will present a menu asking you to approve building “es5-ext”. Make that approval (you can use “a” for all, return and then “y”).
pnpm install
pnpm approve-builds
npx update-browserslist-db@latest
pnpm migration:run
pnpm seed
pnpm build
Let’s do an initial test to make sure everything is running.
pnpm start --port 3434Browse to the IP address of your machine running the software using HTTP on port 3434. You should see ckpoolstats come up.
http://192.168.x.x:3434/If everything is working correctly, press CTRL-C to exit. Three scripts need to be scheduled to be run. First, run them one at a time and ensure no errors.
pnpm seed
pnpm update-users
pnpm cleanup
Next, we need to setup a crontab for those scripts using “crontab -e”. Add these jobs:
PATH=/home/ckstats-testnet/.local/share/pnpm:/usr/bin:/bin
*/1 * * * * cd /home/ckstats-testnet/ckstats && pnpm seed
*/1 * * * * cd /home/ckstats-testnet/ckstats && pnpm update-users
5 */2 * * * cd /home/ckstats-testnet/ckstats && pnpm cleanup
Lastly, we need to create a systemd unit to start everything automatically. Return to being the superuser, and create the file (using sudo):
/etc/systemd/system/ckstats-testnet.service
exit
sudo vi /etc/systemd/system/ckstats-testnet.service
[Unit]
Description=ckstats on testnet
After=multi-user.target ckpool-testnet.service postgresql.service
Requires=ckpool-testnet.service postgresql.service
[Service]
User=ckstats-testnet
Group=testnet
Type=simple
Restart=always
WorkingDirectory=/home/ckstats-testnet/ckstats
ExecStart=/home/ckstats-testnet/.local/share/pnpm/pnpm start --port 3434
RestartSec=30
PrivateTmp=yes
ProtectSystem=full
NoNewPrivileges=yes
PrivateDevices=yes
[Install]
WantedBy=multi-user.targetLet’s enable and start the new service (paste in the commands one at a time).
sudo systemctl daemon-reload
sudo systemctl enable ckstats-testnet.service
sudo systemctl start ckstats-testnet.service
sudo systemctl status ckstats-testnet.service
sudo journalctl -xeu ckstats-testnet.service
Installing Electrum Server
Electrum Server is required if you want to run mempool.space (or if you like to use the Electrum wallet). If you don’t intend to run mempool.space, you don’t need to do this section.
The repository for this is:
https://github.com/romanz/electrs/
electrs - mainnet
Create a user account for mainnet as your root user (you might need to do an “exit” to get back to being the root user).
sudo useradd -g mainnet -m -s /bin/bash electrs-mainnetWe are going to build the Electrum Server by romanz from scratch. Let’s become the new mainnet user and download the software.
sudo su - electrs-mainnetNow we can clone the github repository for electrs.
git clone https://github.com/romanz/electrs.gitNow we verify that what we have downloaded is legit and has been signed. When you first run these commands, it will say:
Can't check signature: No public key
HOWEVER, at the time of writing this, the current tag is NOT signed, so this will fail.
cd electrs
git verify-tag `git describe`
If the signing mentioned a key (which it doesn’t), we would import it with:
gpg --recv-keys "<key>"And then we would run the verify again - but we can’t at the moment.
git verify-tag `git describe`You should get a warning that the signature is good, but the key is not certified.
We can now start the build process.
rustup default stable
cargo clean
ROCKSDB_INCLUDE_DIR=/usr/include
ROCKSDB_LIB_DIR=/usr/lib
cargo build --locked --release
Let’s create a symlink to our local ~/bin directory to make life easier.
mkdir -p ~/bin
ln -s ~/electrs/target/release/electrs ~/bin/electrs
source ~/.profile
Now, create a config file to run electrs. I’m using vi - you should use your favourite text editor.
mkdir -p ~/.electrs
vi ~/.electrs/config.toml
Add the below to the toml file. Update the password with the RPC password for mainnet that you saved when installing Knots. Make sure you use the password.
network = "bitcoin"
daemon_dir= "/home/knots-mainnet/.bitcoin/"
daemon_rpc_addr = "127.0.0.1:8332"
daemon_p2p_addr = "127.0.0.1:8333"
auth="rpcadmin:PASSWORD"

electrum_rpc_addr = "0.0.0.0:8335"
db_dir = "/home/electrs-mainnet/.electrs/db"
index_lookup_limit = 1000

log_filters = "INFO"
Time to test everything works. If you get any errors - resolve them before continuing on. The indexing will need 24 hours (once it is started as a service).
electrsIf there are no errors after 30s, press CTRL-C. We need to set it up as a systemd service now. This needs to be done as a user who can use sudo.
exitCreate the file (using sudo in front of your editor):
/etc/systemd/system/electrs-mainnet.service
[Unit]
Description=Electrum Server on mainnet
After=multi-user.target knots-mainnet.service
Requires=knots-mainnet.service

[Service]
User=electrs-mainnet
Group=mainnet
Type=simple
Restart=always
WorkingDirectory=/home/electrs-mainnet/
ExecStart=/home/electrs-mainnet/bin/electrs
TimeoutSec=120
RestartSec=30

[Install]
WantedBy=multi-user.target
Let’s enable and start the new service (paste in the commands one at a time).
sudo systemctl daemon-reload
sudo systemctl enable electrs-mainnet.service
sudo systemctl start electrs-mainnet.service
sudo systemctl status electrs-mainnet.service
sudo journalctl -xeu electrs-mainnet.service
electrs - testnet
Create a user account for testnet as your root user.
sudo useradd -g testnet -m -s /bin/bash electrs-testnetWe’ve done this before, so I’ll consolidate some steps. Paste the lines one at a time into SSH.
sudo su - electrs-testnet
git clone https://github.com/romanz/electrs.git
Now we verify that what we have downloaded is legit and has been signed. When you first run these commands, it will say:
Can't check signature: No public key
HOWEVER, at the time of writing this, the current tag is NOT signed, so this will fail.
cd electrs
git verify-tag `git describe`
If the signing mentioned a key (which it doesn’t), we would import it with:
gpg --recv-keys "<key>"And then we would run the verify again - but we can’t at the moment.
git verify-tag `git describe`You should get a warning that the signature is good, but the key is not certified.
We can now start the build process.
rustup default stable
cargo clean
ROCKSDB_INCLUDE_DIR=/usr/include
ROCKSDB_LIB_DIR=/usr/lib
cargo build --locked --release
Let’s create a symlink to our local ~/bin directory to make life easier.
mkdir -p ~/bin
ln -s ~/electrs/target/release/electrs ~/bin/electrs
source ~/.profile
Now, create a config file to run electrs. I’m using vi - you should use your favourite text editor.
mkdir -p ~/.electrs
vi ~/.electrs/config.toml
Add the below to the toml file. Update the password with the RPC password for testnet that you saved when you installed Knots. Make sure you use the password.
network = "testnet4"
daemon_dir= "/home/knots-testnet/.bitcoin/"
daemon_rpc_addr = "127.0.0.1:48332"
daemon_p2p_addr = "127.0.0.1:48333"
auth="rpcadmin:PASSWORD"

electrum_rpc_addr = "0.0.0.0:48335"
db_dir = "/home/electrs-testnet/.electrs/db"
index_lookup_limit = 1000

log_filters = "INFO"
Time to test everything works. If you get any errors - resolve them before continuing on.
electrsIf there are no errors after 30s, press CTRL-C. We need to set it up as a systemd service now. This needs to be done as a user who can use sudo.
exitCreate the file (using sudo in front of your editor):
/etc/systemd/system/electrs-testnet.service
[Unit]
Description=Electrum Server on testnet
After=multi-user.target knots-testnet.service
Requires=knots-testnet.service

[Service]
User=electrs-testnet
Group=testnet
Type=simple
Restart=always
WorkingDirectory=/home/electrs-testnet/
ExecStart=/home/electrs-testnet/bin/electrs

[Install]
WantedBy=multi-user.target
Let’s enable and start the new service (paste in the commands one at a time).
sudo systemctl daemon-reload
sudo systemctl enable electrs-testnet.service
sudo systemctl start electrs-testnet.service
sudo systemctl status electrs-testnet.service
sudo journalctl -xeu electrs-testnet.service
Installing Mempool.space
This section relies on node.js having been installed, which was done in the ckstats section. Note that mempool.space V2.5.1 does not properly support testnet4 - so we won’t be deploying that.
The repository for this is:
https://github.com/mempool/mempool
mempool-space backend mainnet
Start as your superuser. First, let’s create the user and database. Note that the “GRANT ALL .. IDENTIFIED VIA” is all one line.
sudo useradd -g mainnet -m -s /bin/bash mempool-mainnet

sudo apt install -y mariadb-server mariadb-client
sudo mariadb
CREATE DATABASE mempoolmainnet;

GRANT ALL PRIVILEGES ON mempoolmainnet.* TO 'mempool-mainnet'@localhost IDENTIFIED VIA unix_socket;
quit
We’ve completed the build process many times, so let's get started.
sudo su - mempool-mainnet
git clone https://github.com/mempool/mempool.git
We will ask Git for a specific release. Never versions require package versions that are not included in Ubuntu 24.04 (such as node.js V20).
cd mempool
git checkout v2.5.1
Try and verify the signature.
git verify-tag `git describe`Try and import the key listed. Alas, the key was not found, so this will fail.
gpg --recv-keys "913C5FF1F579B66CA10378DBA394E332255A6173"After looking at GitHub, and going to Insights, Contributors, I can see there is a user called “wiz” with a gpg key. Lets try manually importing it (this is all one line).
curl https://gist.githubusercontent.com/wiz/8f585a0eb4e3886ba574e3072f6b1e2f/raw/7708491cfdfbbf0f7a17cbdfdb9d27cc80438caf/913C5FF1F579B66CA10378DBA394E332255A6173.asc | gpg --importLet’s try verifying the signature again.
git verify-tag `git describe`Success - it says this is a good signature. Let’s start the build process.
cd backend
npm install
npm run build
Once it is built, we need to create a config file.
cp mempool-config.sample.json mempool-config.jsonEdit mempool-config.json using your favourite editor, search for and update these lines:
Under the “MEMPOOL” section:
"AUTOMATIC_BLOCK_REINDEXING": true,Under the “CORE_RPC” section, update the RPC password that you saved when configuring for knots mainnet earlier on.
"USERNAME": "rpcadmin",
"PASSWORD": "password",
Under the “ELECTRUM” section update:
 "PORT": 8335,
 "TLS_ENABLED": false
Delete the whole “ESPLORA” section.
Delete the whole “SECOND_CORE_RPC” section.
Under the “DATABASE” section:
"SOCKET": "/var/run/mysqld/mysqld.sock",
"DATABASE": "mempoolmainnet",
"USERNAME": "mempool-mainnet",
Let’s do a test run of the backend.
npm run startAfter it has run for a minute or so, stop it with CTRL-C. If there were any errors, fix them before proceeding.
Time to create a systemd unit. I’m using vi, you use your favourite editor.
exit
sudo vi /etc/systemd/system/mempool-backend-mainnet.service
Add add:
[Unit]
Description=mempool.space backend running on mainnet
After=multi-user.target electrs-mainnet.service mariadb.service
Requires=knots-mainnet.service electrs-mainnet.service mariadb.service

[Service]
User=mempool-mainnet
Group=mainnet
Type=simple
Restart=always
WorkingDirectory=/home/mempool-mainnet/mempool/backend
ExecStart=/usr/bin/npm run start
PrivateTmp=yes
ProtectSystem=full
NoNewPrivileges=yes
PrivateDevices=yes

[Install]
WantedBy=multi-user.target
Let’s enable and start the new service (paste in the commands one at a time).
sudo systemctl daemon-reload
sudo systemctl enable mempool-backend-mainnet.service
sudo systemctl start mempool-backend-mainnet.service
sudo systemctl status mempool-backend-mainnet.service
sudo journalctl -xeu mempool-backend-mainnet.service
mempool-space frontend (mainnet only)
mempool.space supports the old testnet, but not testnet4 (which is what we use), so we can’t set it up for testnet4.
sudo su - mempool-mainnet
cd mempool/frontend
cp mempool-frontend-config.sample.json mempool-frontend-config.json
Next, install and build the front end.
npm install
npm run build
Let’s try running the front end, but pointing to the public mempool backend server. This will make sure the frontend is working.
npm run serve:local-prodWait till you can see it mention something about port 4200 (this might take several minutes), then try accessing the front end using port 4200 on the IP address associated with your node.
http://192.168.x.x:4200/If all is working well, press CTRL-C. If it’s not working, then fix any issues before continuing. Now let’s run it again, but talking to our backend. If there are any issues, it must be to do with the backend config. Look there to fix any issues. Use the same URL as above to check it.
npm run ng -- serve -c local --host 0.0.0.0Once that is working, we need to create a systemd unit for it.
exit
sudo vi /etc/systemd/system/mempool-frontend.service
And add:
[Unit]
Description=mempool.space frontend
After=multi-user.target mempool-backend-mainnet.service
Requires=mempool-backend-mainnet.service

[Service]
User=mempool-mainnet
Group=mainnet
Type=simple
Restart=always
WorkingDirectory=/home/mempool-mainnet/mempool/frontend
ExecStart=/usr/bin/npm run ng -- serve -c local --host 0.0.0.0
RestartSec=30
PrivateTmp=yes
ProtectSystem=full
NoNewPrivileges=yes
PrivateDevices=yes

[Install]
WantedBy=multi-user.target
Let’s enable and start the new service (paste in the commands one at a time).
sudo systemctl daemon-reload
sudo systemctl enable mempool-frontend.service
sudo systemctl start mempool-frontend.service
sudo systemctl status mempool-frontend.service
sudo journalctl -xeu mempool-frontend.service
Note that after starting the front end, it can take 1 or 2 minutes before the web interface starts responding.
Works!
I believe this line to be incorrect:
PIDFile=/home/knots-testnet/.bitcoin/testnet4/bitcoin.pid
Should be:
PIDFile=/home/knots-testnet/.bitcoin/bitcoin.pid